I guess December was pretty uneventful for tack making. I did work on making a racing saddle so I could take progress photos for the magazine article. The saddle looked pretty good actually, but it wasn't something I was planning to finish so I decided just to chuck it. Oh well! I'm tired of making racing tack right now anyway.
I started up working on my Lg. Traditional draft harness some more, and I think it'll be phenomenal when I'm done! I haven't seen any Lg. Traditional harnesses on Equus Maximus before since you have to create some of the major the hardware by hand, so this might be something special. I had initially started at the front with the bridle and such, but kind of hit a wall when I needed a large enough bit and the hames. So, I'm picking up work from the back. Here's photos of what I'm doing so far:
(Above) This is my first uptug out of 6 that need to be made. It's called a boxed loop uptug. I have patent leather backing & detailing on the uptug. For being so small, it took a couple hours to make since I had to battle the paint a bit. Now I know how long I have to wait for it to dry before I touch it!
(Above) The start of the swinging toggle. This will be a mini-sized drafter that sits upon the top of the peaked collar and/or on the top of the back pad. This one is super small, but I think I actually need to go smaller. The lump of clay at the base is only to hold him up. I have to wait for his body sections to dry before adding legs & such. I'm thinking this will wind up being a redo. I have another idea brewing should the clay not work out. I see the Susan Bensema-Young harness sets photographed on her site (
www.timarustarii.com), but I can't quite tell what she does for the toggle. Her tack is stellar, but I'm trying to create something even more detailed! I don't want to buy another artist's how-to book, so I'm content to figure this out myself.
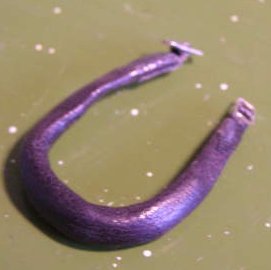
(Above) Here we have the crupper which I probably made 3+ years ago...fully stuffed and has a wire core. It's ok, but I'll probably redo it. I don't have working buckles there at the top which I think I would prefer to have. These can be tricky to make properly, so I'll have to see how it looks once more things come together.
(Above) This is the collar I started a couple years ago. It just got its black color today and already looks much better! It's stuffed, has a wire core, and is hand-stitched at the seams. I'm debating on whether or not to put a flannel panel (haha!) on the bottom where it would sit on his neck. Most collars have some kind of fabric underside I believe. I've never actually touched a real draft harness in person, so this is all based on photos that I find on the web.
(Above) This is the collar latch that closes the top of the collar once you have it around the horse's neck. I made every bit of this, and it works too! Unfortunately it's a detail that won't be seen since it'll sit under the peaked collar. Why am I doing it then? I don't know, I guess for the sake of realism. The leather straps on both sides are just junk leather to hold everything together until I can incorporate it officially.
(Above) Lastly, we have the side check chain that goes through the tear drop and attaches to a swivel ring that really swivels around. I think that's pretty cool! I'm not wild about the look of the tear drop though. I think that'll be a redo.
So, now you can see why I'm taking so long on this set. I want to have as much detail as I can fit, and since it's in a larger scale, I can throw in working parts. The trick is getting them to actually work :) Anyway, I think I'm going to take another break and go watch a movie. I'm happy to report that it's Jan 1st, and we still don't have snow on the ground! I wish the whole winter would be snow free!